Getting Started with the T-Embed CC1101 with custom firmware
9 May 2025
Introduction
⚠️ Disclaimer: The Lilygo T-embed CC1101 and Bruce should not be used illegally. For educational purposes only.
The Lilygo T-Embed CC1101 is a pocket-sized dev board with Sub-GHz, IR, NFC, WiFi, BLE, BadUSB and many more protocols. It uses an ESP-32 S3 for the microcontroller. I've made this blog as I've noticed as the community is still small, and more tutorials always need to be made.
By using Bruce Firmware, the TMB can be unlocked to properly access all these functions. It can operate even similarly to a Flipper Zero, but with WiFi built in.
Hardware
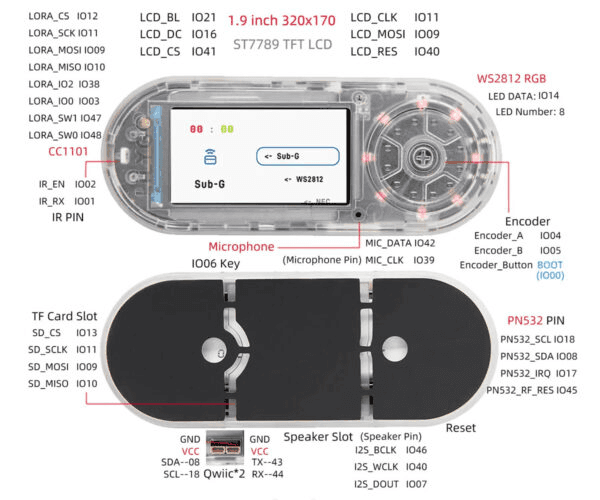
Hardware Overview
Microcontroller: ESP32-S3-WROOM-1
Display: 1.9" ST7789V TFT (320x170)
Radio: CC1101 Sub-GHz transceiver (300–928 MHz)
NFC: PN532 module
Audio: Microphone and I2S speaker support
LEDs: 8x WS2812 RGB LEDs
Battery: 3.7V 1300mAh LiPo with BQ25896 charger and BQ27220 fuel gauge
Interfaces: USB-C, SPI, I2C, UART(GitHub, Bastelgarage)
Setup Guide
Pull the magnetic back off the TMB.

Unplug the battery lead.

Visit Bruce Flasher to flash the TMB. Select the Latest release > Lilygo > T-Embed CC1101
While holding the central button on the encoder and the RST button on the PCB [next to the ESP32S3 Chip] plug the TMB into your computer via a USB-C cable.

Click install. Select the T-Embed's serial port and start flashing!
Bruce should be running successfully on the TMB now.
Next Steps
Explore the Bruce wiki to familiarise yourself with Bruce's amazing capabilities.
Install the IRDB onto the SD card, to be able to access a wide database of IR files and remotes.
Install a popular SubGHz repo onto the SD card, allowing you to access a wide range of .sub files.
Customise your TMB by using a theme
Expand the TMB's range of SubGHz by using an external CC1101 Module [Tutorial soon]
Expand the TMB's capabilities by adding an NRF module to add jamming capabilities. [Tutorial soon]